Fresh finds this May—now up to 30% off. ✨
Jukebox Print
CAD
USD
EUR
CAD
USD
EUR
Sign In
  • Custom Stickers
  • Popular Sticker Choices
    • Custom Stickers
    • Sticker Sheets
    • Circle Stickers
    • Roll Labels

    Save 20% on Sticker Sheets

    See All Stickers
    • Most Popular
      • Die Cut Stickers
      • Sticker Sheets
        Sale
      • Circle Stickers
        Sale
      • Square Stickers
        Sale
      • Kiss Cut Stickers
      • Bumper Stickers
      • Clear Stickers
      • Roll Labels
        Sale
      • Vinyl Lettering
    • Eco Friendly
      • Eco-Natural Paper
      • Eco-Soft Matte
    • Metallic & Special Finish
      • Gold Stickers
      • Rose Gold Stickers
      • Silver Stickers
      • Glitter Stickers
      • Holographic Stickers
        Sale
      • Spot Gloss Stickers
      • White Ink Stickers
    • Durable & Utility
      • Dry Erase Stickers
      • Reflective Stickers
    • Custom & Specialty
      • Wine Labels
      • Wall Graphics
      • Cycling Name Stickers
  • Business Cards
  • Popular Business Card Choices
    • Soft Touch Business Cards
    • Standard Business Cards
    • Mohawk Superfine Business Cards
    • Recycled Business Cards

    Save 25% on Soft Touch Business Cards

    See All Business Cards
    • Signature Cards
      • Soft Touch
        Sale
    • Classic Cards
      • Standard
      • Sandy Matte
      • Spot Gloss
        Sale
    • Eco-Friendly Cards
      • Recycled Matte
        Sale
      • Kraft
      • Cotton
      • Cannabis
    • Premium Cards
      • Mohawk Superfine
      • Pearl
      • Colorplan
    • Luxury Cards
      • Premium Black
      • Embossed
      • Foil Stamp
        Sale
      • Letterpress
        Sale
    • Ultra thick Cards
      • Triplex
      • Duplex
        Sale
    • Finishing Touches
      • Painted Edges
        Sale
      • Shaped Cards
      • Rounded Corners
  • Postcards
  • Marketing Materials
  • Popular Marketing Material Choices
    • Magnets
    • Posters
    • Brochures
    • Hang Tags

    Save 25% on All Posters

    See All Marketing Materials
    • Promotional Essentials
      • Postcards
        Sale
      • Flyers
      • Magnets
      • Brochures
      • Custom Buttons
      • Bookmarks
      • Custom Coasters
      • Rubber Stamps
      • Table Tent Cards
      • Door Hangers
    • Large Format
      • Posters
        Sale
      • Large Posters
        Sale
      • Foam Board Signs
      • Banners
      • Canvas Prints
    • Packaging
      • Hang Tags
        Sale
      • Custom Kraft Rolls
      • Gift Card Holders
      • Tissue Paper
      • Mini Boxes
    • Calendars
      • Wire-O Calendars
      • Wall Calendars
      • Standard Calendars
      • Desktop Calendars
  • Invitations & Stationery
  • Popular Invitations & Stationery Choices
    • Greeting Cards
    • Notepads
    • Wedding Invitations
    • Custom Envelopes
    See All Invitations & Stationery
    • Greeting Cards
    • Notepads
      Sale
    • Wedding Invitations
      Sale
    • Custom Envelopes
    • Letterheads
    • Presentation Folders
  • Popular Book Choices
    • Saddle Stitch Books
    • Perfect Bound Books
    • Wire-O Books
    • Saddle Stitch Books
      Sale
    • Perfect Bound Books
      Sale
    • Wire-O Books
  • Quote Request
  • Order Sample Pack
Back

How to Create a Die Cut Sticker with a Kiss Cut in Illustrator in 7 Quick Steps

TUTORIALS

4 min read

•

Carlos Behrens

•

May 27, 2019

How to Create a Die Cut Sticker with a Kiss Cut in Illustrator in 7 Quick Steps
In this article
  • What is a die cut sticker?
  • What is a kiss cut sticker?
  • How to make a die cut sticker (with a kiss cut) in Illustrator
  • Set up your file
  • Create the Kiss-Cut layer
  • Create the Kiss-Cut line
  • Offset the Kiss-Cut line
  • Create the Thru-cut layer
  • Offset the Thru-cut line
  • Review and save your file

Custom-shaped stickers are fun to share and easy to make. By adding customized cut lines to any design, you can create borderless die-cut stickers or easy-to-peel kiss-cut stickers within minutes.

This tutorial demonstrates how to adapt your logo or illustrated mascot into a custom shape kiss-cut sticker using Adobe Illustrator.

What is a die cut sticker?

Die cut stickers are stickers that are cut to the exact shape of your design. This means that the shape of your sticker will be completely unique and won’t have any borders.

What is a kiss cut sticker?

Kiss-cut stickers are stickers that are cut around the edges but still have a thin layer of backing material attached to them. This makes it easy to peel off the sticker and apply it without having to worry about peeling away any extra material. Kiss cut stickers are often used for things like product labels, window decals, and bumper stickers.

How to make a die cut sticker (with a kiss cut) in Illustrator

Here's how to get started.

Set up your file

The first step is to open the artwork you want to make the sticker with. We suggest changing the color mode to CMYK and the resolution to 300. Make sure the entire artwork is in one single layer called “Artwork” and resize the artboard to the size you want the sticker to be (no smaller than 2 inches by 2 inches).

Create the Kiss-Cut layer


Since the file is set up, it’s time to create the Kiss-Cut. The kiss-cut layer is where you'll determine the shape of your sticker when it’s peeled off the backing and set the kiss-cut guide line.

First, lock and hide the “Artwork” layer. Now duplicate that layer, rename the duplicate as “Kiss-Cut” and move it under the “Artwork” layer.

Create the Kiss-Cut line

Select “Kiss-Cut” layer, go to Window > Pathfinder > Unite to merge your artwork into a solid shape.


With that solid shape selected, change the Stroke color to 100% Magenta and set the Fill color to None.

Offset the Kiss-Cut line

Make the “Artwork” layer visible again and select the “Kiss-Cut” layer. Now go to Object > Path > Offset Path.


On the Offset Path window, set the offset distance you want, which is the white space between your design and the kiss-cut line. This will determine the shape your sticker will have when peeled. For this tutorial we used a distance of 0.1 inches. We strongly suggest you use Round joins for a smoother shape. Now you have a Kiss-Cut line.

You can change the Kiss-Cut stroke width to any number above 0.25 points. This stroke won’t appear on the final sticker and is only a guide. We used 1 point.

Create the Thru-cut layer

Duplicate “Kiss-Cut” layer. name this new layer “Thru-Cut”. Move this layer to the bottom of the list in the Layers panel. The thru-cut layer is where you'll determine the shape and outer cut line of your finished sticker. Change the stroke color to 100% Cyan.

Offset the Thru-cut line

With the “Thru-Cut” layer selected, go again to Object > Path > Offset Path and set the often distance as desired. We used 0.2 inches for this tutorial. Now you have a Thru-cut line.

Review and save your file

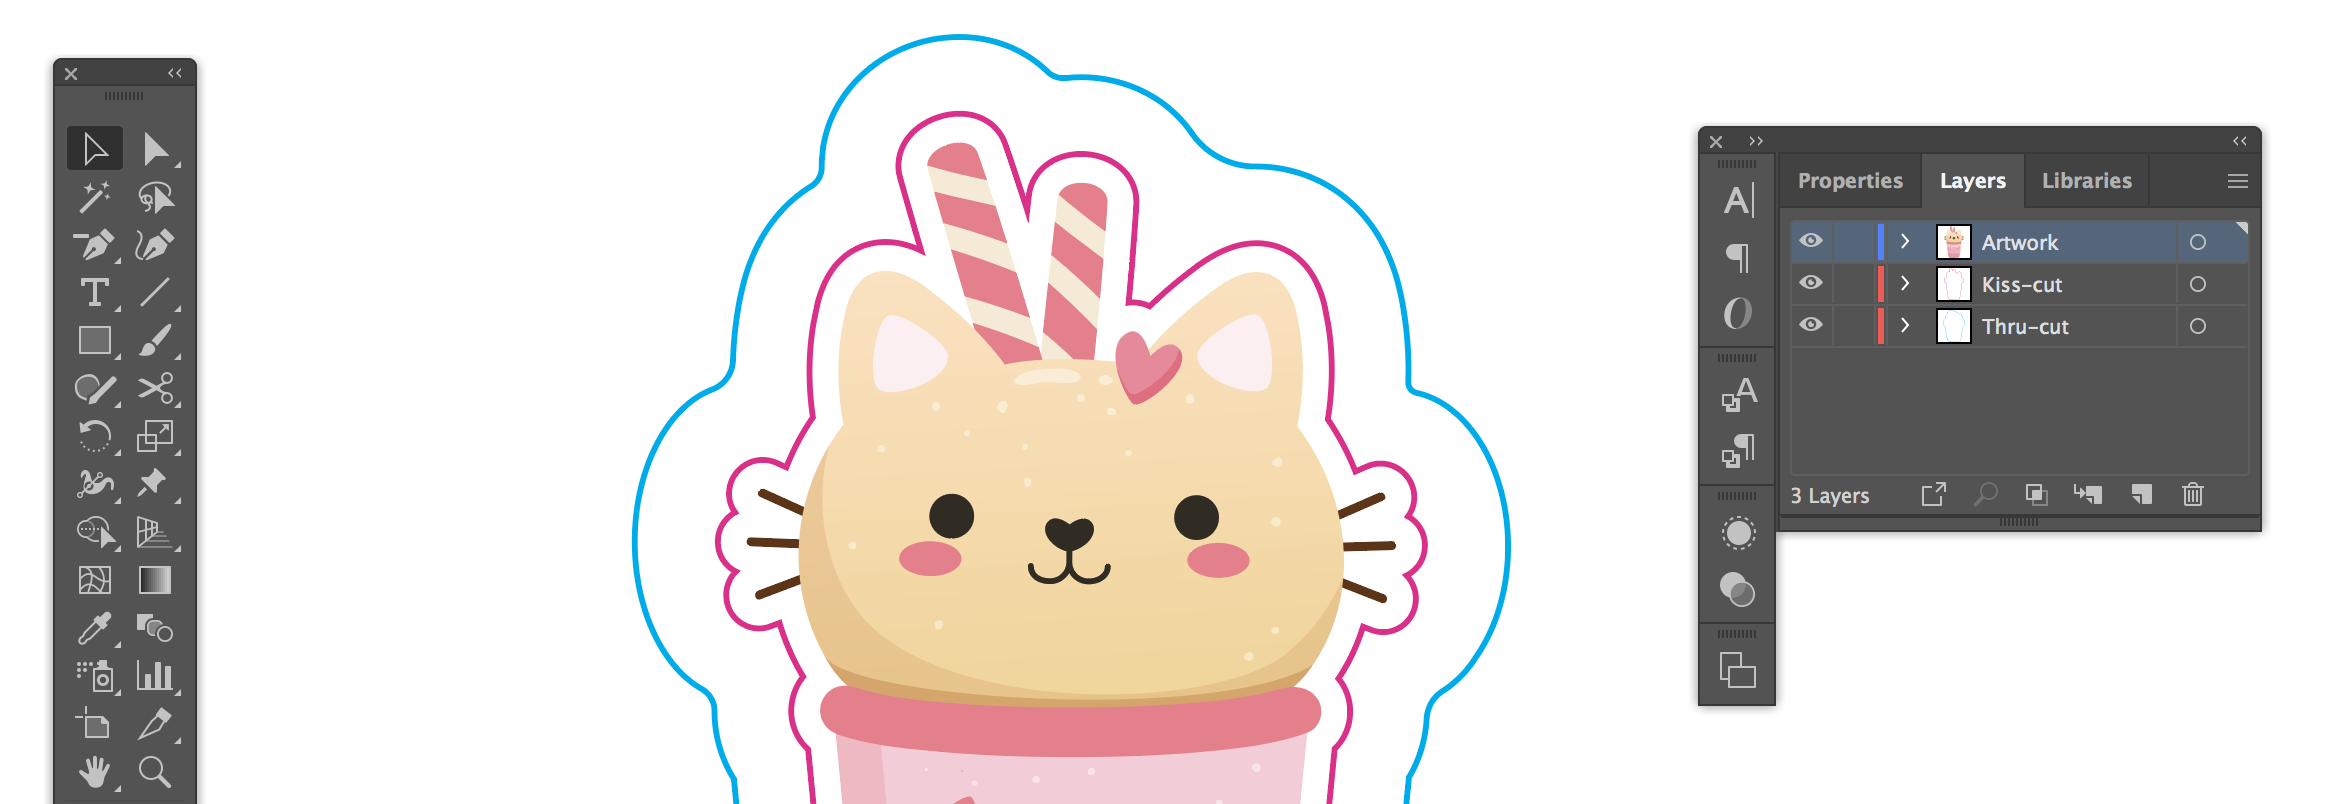
Your sticker file should have three visible labeled layers:
“Artwork” – your design
“Kiss-Cut” – the inner outline of your sticker
“Thru-Cut” – the outer outline of your sticker

Now go and save your file as an EPS and that’s it! You have a file ready to be printed as a sticker. Now it’s time to be creative and make your own super fun sticker for any marketing or personal purposes. Enjoy!

Carlos Behrens image
ABOUT THE AUTHOR

Carlos Behrens

Carlos Behrens is a Venezuelan graphic designer living in Madrid. He works with clients from all around the world designing everything from logos and stationery to animations and 3D graphics. He loves to share his knowledge with people who are eager to learn.

Share this article

Back to top

Related articles

All articles
The Quick Checklist for Exporting a Print-Ready PDF From Illustrator or InDesign
TUTORIALS

The Quick Checklist for Exporting a Print-Ready PDF From Illustrator or InDesign

Make sure you export your files correctly with this quick and easy checklist. We also included a PDF you can print and stick to your wall to make it even easier for future printing projects.

Jun 1, 2022

•

8 min read

5 Simple Steps To Generating QR Codes Using InDesign
TUTORIALS

5 Simple Steps To Generating QR Codes Using InDesign

No matter your design experience, you can create QR codes using InDesign. The design software makes it super simple to do so with this five-step process.

Jul 18, 2022

•

4 min read

Popular Products
  • Die Cut Stickers
  • Sticker Sheets
  • Roll Labels
  • Business Cards
  • Custom Flyers
  • Custom Notepads
Resources
  • Shipping Rates
  • Business Card Maker
  • Sticker Maker
  • Request Samples
Support
  • Contact Us
  • Help & FAQ
  • Account Center
  • Status
Company
  • About Us
  • Careers
  • Jukebox Blog
Contact
  • contact@jukeboxprint.com
© 2025 Jukebox
  • Privacy Policy
  •  • 
  • Terms & Conditions

Log in

Email address is invalid
Password is invalid
I forgot my password
Don’t have an account yet? Sign up

Forgot Your Password?

Not to worry. Enter the email address you used when you joined and we’ll send you instructions to reset your password.

Email address is invalid
Back

We've sent you an email with a link to reset your password.

Check your spam and promotions folder if it doesn’t appear in your main inbox.

Didn’t receive the email?

Create your account

Or, create an account with email.

  • 8 or more characters
  • Upper and lowercase letter
  • At least one number
Terms of ServicePrivacy Policy,
Already have an account? Sign In