Custom-shaped stickers are fun to share and easy to make. By adding customized cut lines to any design, you can create borderless die-cut stickers or easy-to-peel kiss-cut stickers within minutes.
This tutorial demonstrates how to adapt your logo or illustrated mascot into a custom shape kiss-cut sticker using Adobe Illustrator.
What is a die cut sticker?
Die cut stickers are stickers that are cut to the exact shape of your design. This means that the shape of your sticker will be completely unique and won’t have any borders.
What is a kiss cut sticker?
Kiss-cut stickers are stickers that are cut around the edges but still have a thin layer of backing material attached to them. This makes it easy to peel off the sticker and apply it without having to worry about peeling away any extra material. Kiss cut stickers are often used for things like product labels, window decals, and bumper stickers.
How to make a die cut sticker (with a kiss cut) in Illustrator
Here's how to get started.
Set up your file
The first step is to open the artwork you want to make the sticker with. We suggest changing the color mode to CMYK and the resolution to 300. Make sure the entire artwork is in one single layer called “Artwork” and resize the artboard to the size you want the sticker to be (no smaller than 2 inches by 2 inches).
Create the Kiss-Cut layer
Since the file is set up, it’s time to create the Kiss-Cut. The kiss-cut layer is where you'll determine the shape of your sticker when it’s peeled off the backing and set the kiss-cut guide line.
First, lock and hide the “Artwork” layer. Now duplicate that layer, rename the duplicate as “Kiss-Cut” and move it under the “Artwork” layer.
Create the Kiss-Cut line
Select “Kiss-Cut” layer, go to Window > Pathfinder > Unite to merge your artwork into a solid shape.
With that solid shape selected, change the Stroke color to 100% Magenta and set the Fill color to None.
Offset the Kiss-Cut line
Make the “Artwork” layer visible again and select the “Kiss-Cut” layer. Now go to Object > Path > Offset Path.
On the Offset Path window, set the offset distance you want, which is the white space between your design and the kiss-cut line. This will determine the shape your sticker will have when peeled. For this tutorial we used a distance of 0.1 inches. We strongly suggest you use Round joins for a smoother shape. Now you have a Kiss-Cut line.
You can change the Kiss-Cut stroke width to any number above 0.25 points. This stroke won’t appear on the final sticker and is only a guide. We used 1 point.
Create the Thru-cut layer
Duplicate “Kiss-Cut” layer. name this new layer “Thru-Cut”. Move this layer to the bottom of the list in the Layers panel. The thru-cut layer is where you'll determine the shape and outer cut line of your finished sticker. Change the stroke color to 100% Cyan.
Offset the Thru-cut line
With the “Thru-Cut” layer selected, go again to Object > Path > Offset Path and set the often distance as desired. We used 0.2 inches for this tutorial. Now you have a Thru-cut line.
Review and save your file
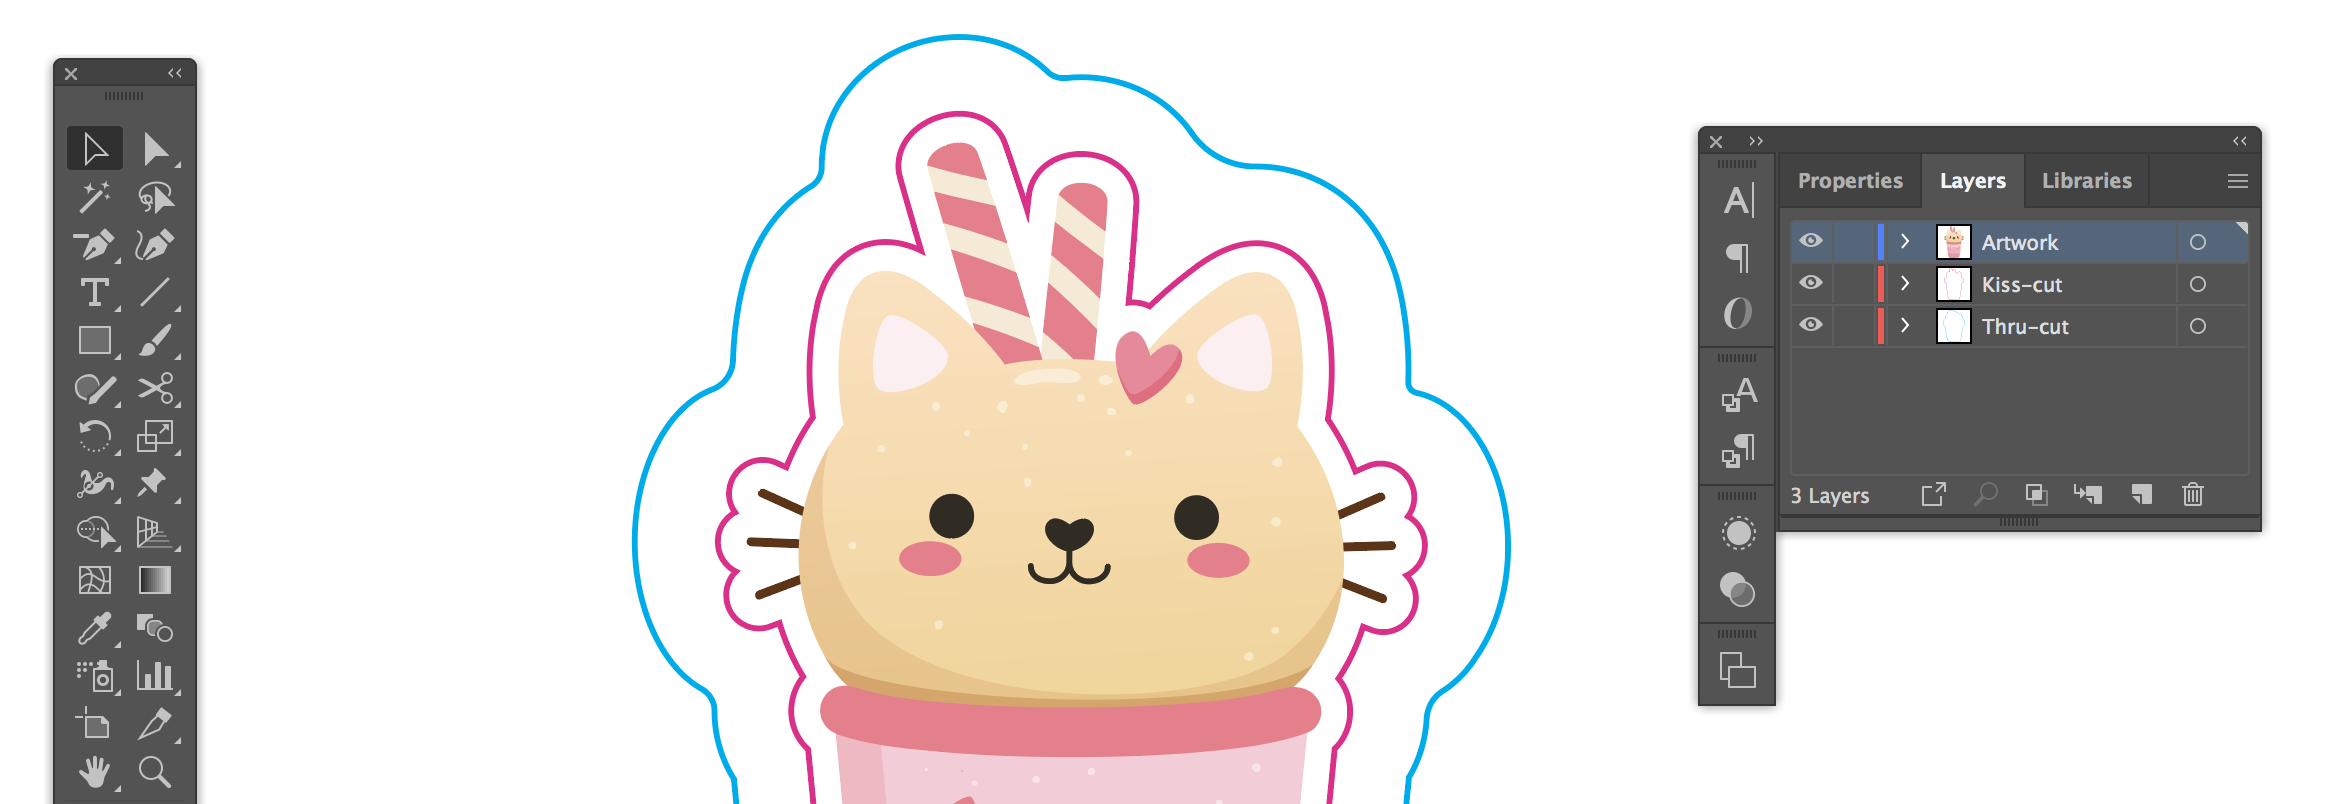
Your sticker file should have three visible labeled layers:
“Artwork” – your design
“Kiss-Cut” – the inner outline of your sticker
“Thru-Cut” – the outer outline of your sticker
Now go and save your file as an EPS and that’s it! You have a file ready to be printed as a sticker. Now it’s time to be creative and make your own super fun sticker for any marketing or personal purposes. Enjoy!