Fresh finds this May—now up to 30% off. ✨
Jukebox Print
CAD
USD
EUR
CAD
USD
EUR
Sign In
  • Custom Stickers
  • Popular Sticker Choices
    • Custom Stickers
    • Sticker Sheets
    • Circle Stickers
    • Roll Labels

    Save 20% on Sticker Sheets

    See All Stickers
    • Most Popular
      • Die Cut Stickers
      • Sticker Sheets
        Sale
      • Circle Stickers
        Sale
      • Square Stickers
        Sale
      • Kiss Cut Stickers
      • Bumper Stickers
      • Clear Stickers
      • Roll Labels
        Sale
      • Vinyl Lettering
    • Eco Friendly
      • Eco-Natural Paper
      • Eco-Soft Matte
    • Metallic & Special Finish
      • Gold Stickers
      • Rose Gold Stickers
      • Silver Stickers
      • Glitter Stickers
      • Holographic Stickers
        Sale
      • Spot Gloss Stickers
      • White Ink Stickers
    • Durable & Utility
      • Dry Erase Stickers
      • Reflective Stickers
    • Custom & Specialty
      • Wine Labels
      • Wall Graphics
      • Cycling Name Stickers
  • Business Cards
  • Popular Business Card Choices
    • Soft Touch Business Cards
    • Standard Business Cards
    • Mohawk Superfine Business Cards
    • Recycled Business Cards

    Save 25% on Soft Touch Business Cards

    See All Business Cards
    • Signature Cards
      • Soft Touch
        Sale
    • Classic Cards
      • Standard
      • Sandy Matte
      • Spot Gloss
        Sale
    • Eco-Friendly Cards
      • Recycled Matte
        Sale
      • Kraft
      • Cotton
      • Cannabis
    • Premium Cards
      • Mohawk Superfine
      • Pearl
      • Colorplan
    • Luxury Cards
      • Premium Black
      • Embossed
      • Foil Stamp
        Sale
      • Letterpress
        Sale
    • Ultra thick Cards
      • Triplex
      • Duplex
        Sale
    • Finishing Touches
      • Painted Edges
        Sale
      • Shaped Cards
      • Rounded Corners
  • Postcards
  • Marketing Materials
  • Popular Marketing Material Choices
    • Magnets
    • Posters
    • Brochures
    • Hang Tags

    Save 25% on All Posters

    See All Marketing Materials
    • Promotional Essentials
      • Postcards
        Sale
      • Flyers
      • Magnets
      • Brochures
      • Custom Buttons
      • Bookmarks
      • Custom Coasters
      • Rubber Stamps
      • Table Tent Cards
      • Door Hangers
    • Large Format
      • Posters
        Sale
      • Large Posters
        Sale
      • Foam Board Signs
      • Banners
      • Canvas Prints
    • Packaging
      • Hang Tags
        Sale
      • Custom Kraft Rolls
      • Gift Card Holders
      • Tissue Paper
      • Mini Boxes
    • Calendars
      • Wire-O Calendars
      • Wall Calendars
      • Standard Calendars
      • Desktop Calendars
  • Invitations & Stationery
  • Popular Invitations & Stationery Choices
    • Greeting Cards
    • Notepads
    • Wedding Invitations
    • Custom Envelopes
    See All Invitations & Stationery
    • Greeting Cards
    • Notepads
      Sale
    • Wedding Invitations
      Sale
    • Custom Envelopes
    • Letterheads
    • Presentation Folders
  • Popular Book Choices
    • Saddle Stitch Books
    • Custom Notebooks
    • Perfect Bound Books
    • Wire-O Books
    • Custom Notebooks
      Sale
    • Perfect Bound Books
      Sale
    • Saddle Stitch Books
      Sale
    • Wire-O Books
      Sale
    • Catalogs
      Sale
  • Quote Request
  • Order Sample Pack
Back

The Quick Checklist for Exporting a Print-Ready PDF From Illustrator or InDesign

TUTORIALS

8 min read

•

Team Jukebox

•

Jun 1, 2022

The Quick Checklist for Exporting a Print-Ready PDF From Illustrator or InDesign
In this article
  • Remove any objects from the artboard that are not intended to be printed
  • Check links that are missing or that need to be updated
  • Make sure the Bleed Area is completely filled with your background content
  • Check if there’s no important content outside the Safety Margin
  • Double-check your spelling and any design related flaws
  • Delete any templates you used, or at least enable the visibility of that layer
  • The document color mode should be set to CMYK
  • Images should be at least 300dpi
  • Outline your text to avoid any font related issues

Exporting your files correctly can be a challenging task for some. Even experienced designers are often double-checking some specifics on the web to make sure they’re doing everything correctly. So below we’ll guide you through this process step-by-step and in case you’d prefer to print it for future reference, we created a PDF for you guys to make it even easier which you can find at the bottom.

First things first, when your design is ready there are some steps you should focus on to double-check your own work and make sure it’s technically correct.

Remove any objects from the artboard that are not intended to be printed

For the sake of cleaning up your file, check if there are any extra layers, swatches, links, objects or other elements that don’t need to get printed. This way you’ll prevent any errors after printing and after all that work you put in, that’s something you definitely don’t want.

Check links that are missing or that need to be updated

Any missing or outdated links would be mentioned with a popup most of the time but taking the time to check this beforehand is always the better way. In both Illustrator and InDesign you can find this in the Links Panel.

Make sure the Bleed Area is completely filled with your background content

The Bleed Area is there to create some margin for the printing process and to avoid any white borders around your design you should check if your background color is completely overlapping this.

Check if there’s no important content outside the Safety Margin

Just like the Bleed Area is there to create some margin on the outside of your design, the Safety Margin takes care of the inside. Avoid placing any important elements (e.g. logos, text) outside that Safety Margin. Would be a shame if your phone number would be cropped off on your business card am I right?

Double-check your spelling and any design related flaws

That same phone number should be typed correctly to avoid missing out on that dream client that called the wrong number. So double-check all your copy and other design elements from top to bottom and test if any of the used QR codes or other links are working properly.

Delete any templates you used, or at least enable the visibility of that layer

When you’re working from a template, make sure this layer is enabled or deleted once you’re ready to export your files as this will be visible in the print as well.

The document color mode should be set to CMYK

In case you’re not familiar with the difference between CMYK and RGB, head over to our article on this topic and you’ll be up-to-date within a couple of minutes. In short, RGB is meant for digital purposes and CMYK should be used for printing.

So whenever you have used any RGB swatches or your Document Color Mode is still set on RGB, you could change this to CMYK. The color tones will shift a bit as CMYK doesn't have the bright hues of RGB so you’ll need to edit this.

Images should be at least 300dpi

To avoid any low-quality raster images on your print, try to get the maximum quality for this. 300dpi is the standard for high quality printing, while 150dpi is still considered as acceptable but avoid going any lower than that.

Outline your text to avoid any font related issues

We have received many questions on this topic over the years so we decided to create an in-depth article about the question ‘Is it still necessary to outline your text?' (Spoiler: It’s not). In case you’re exporting your file to a PDF it’s not needed to outline your text as your fonts will be embedded automatically. When you work with a different file format or in case you need to share your open files with someone else you could either Embed your Fonts or choose to outline them.

So in case you still prefer to work outline your text, select your text and go to Type > Create Outlines. Make sure to go back to this step after exporting to keep your editable text for future purposes.

Once you’ve checked everything above, it’s time to export!

For InDesign:

  1. Click on File > Export
  2. Illustrator - Click on File > Save A Copy
    InDesign - Click on File > Export
  3. Set the Format to “Adobe PDF (Print)”, name the file and select “Save”
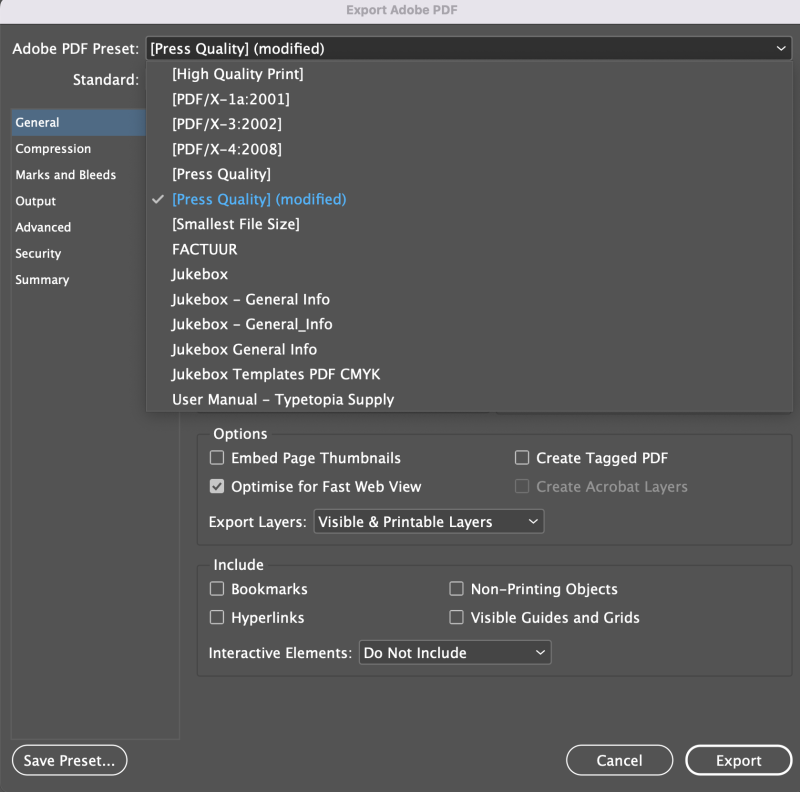
  4. You will be prompted with a dialogue box of settings. Select  the “Press Quality” preset. Under “Marks and Bleeds” check the box ‘Crop Marks’.
  5. Check the “Use Document Bleed Settings” box to include the Bleed Area you defined during the setup of your file. In case you haven’t done this during the setup, make sure to check the minimum size of the Bleed Area for your type of document.
  6. Click “Export”.

[Jukebox-Exporting-Checklist-for-InDesign.pdf]

For Illustrator:

  1. Click on File > Save a Copy
  2. Set the Format to “Adobe PDF (Print)”, name the file and select “Save”
  3. You will be prompted with a dialogue box of settings. Select  the “Press Quality” preset. Under “Marks and Bleeds” check the box ‘Crop Marks’.
  4. Check the “Use Document Bleed Settings” box to include the Bleed Area you defined during the setup of your file. In case you haven’t done this during the setup, make sure to check the minimum size of the Bleed Area for your type of document.
  5. Click “Export”.

[Jukebox-Exporting-Checklist-for-Illustrator.pdf]

That’s it! And if it helps you, use the PDF files above which are set to A3 and can be printed for future reference. Now you won’t have to scour the web every time you need to export something for print.

Curious to know how you can set up your document properly? To guide you through this process we created an article to help you out with each important step from setting up a Bleed Margin, Color Profiles, Template Layers and much more...

So the next time you need to create some new Business Cards or Custom Stickers, it will be a smooth ride.

And get in touch with our lovely Support Team in case you have any questions.

Share this article

Back to top

Related articles

All articles
The Ultimate Guide to Setting up your Business Card File
LEARN

The Ultimate Guide to Setting up your Business Card File

To help you understand the overall process of setting up and exporting your document when printing a business card so you’ll have a business card that leaves a mark with your future client.

Jun 23, 2022

•

4 min read

Outlining Your Fonts: Is It Still Necessary?
LEARN

Outlining Your Fonts: Is It Still Necessary?

There are many reasons and myths out there why you should convert your text to outlines and while most of the time this won’t be even necessary, there are still a lot of misconceptions on this topic so we’re here to help you understand.

May 15, 2022

•

4 min read

Popular Products
  • Die Cut Stickers
  • Sticker Sheets
  • Roll Labels
  • Business Cards
  • Custom Flyers
  • Custom Notepads
Resources
  • Shipping Rates
  • Business Card Maker
  • Sticker Maker
  • Request Samples
Support
  • Contact Us
  • Help & FAQ
  • Account Center
  • Status
Company
  • About Us
  • Careers
  • Jukebox Blog
Contact
  • contact@jukeboxprint.com
© 2025 Jukebox
  • Privacy Policy
  •  • 
  • Terms & Conditions

Log in

Email address is invalid
Password is invalid
I forgot my password
Don’t have an account yet? Sign up

Forgot Your Password?

Not to worry. Enter the email address you used when you joined and we’ll send you instructions to reset your password.

Email address is invalid
Back

We've sent you an email with a link to reset your password.

Check your spam and promotions folder if it doesn’t appear in your main inbox.

Didn’t receive the email?

Create your account

Or, create an account with email.

  • 8 or more characters
  • Upper and lowercase letter
  • At least one number
Terms of ServicePrivacy Policy,
Already have an account? Sign In